
I switched to a wireless keyboard and mouse about four years ago and never once thought about going back. Not because wireless is glamorous, but because removing two cables from the front of my desk turned out to matter more than I expected. The problem is that most people buy the combo, plug in the receiver, and figure the rest takes care of itself. It mostly does, but there are about ten minutes of setup work that determines whether you end up with a truly clean desk and a responsive, comfortable input experience, or a setup that kind of works but quietly annoys you every day.
This guide covers that ten minutes in full, using the Logitech MK270 as the reference combo. The MK270 is the best-selling wireless keyboard and mouse on Amazon, with more than 118,000 reviews and a 4.5-star average, and it uses Logitech's Unifying Receiver system, which is the same across most of their wireless peripherals. If you have a different brand, the pairing steps will vary slightly, but the positioning, OS tuning, and maintenance steps apply to any wireless combo.
Following this guide with the Logitech MK270? Check today's price before you start.
The MK270 is the combo I use for this walkthrough. Two-year battery life claim on the keyboard, 12-month on the mouse, 33-foot wireless range, and a single USB Unifying Receiver for both devices.
Amazon Check Today's Price on Amazon →Step 1: Find the Unifying Receiver and Plug It In
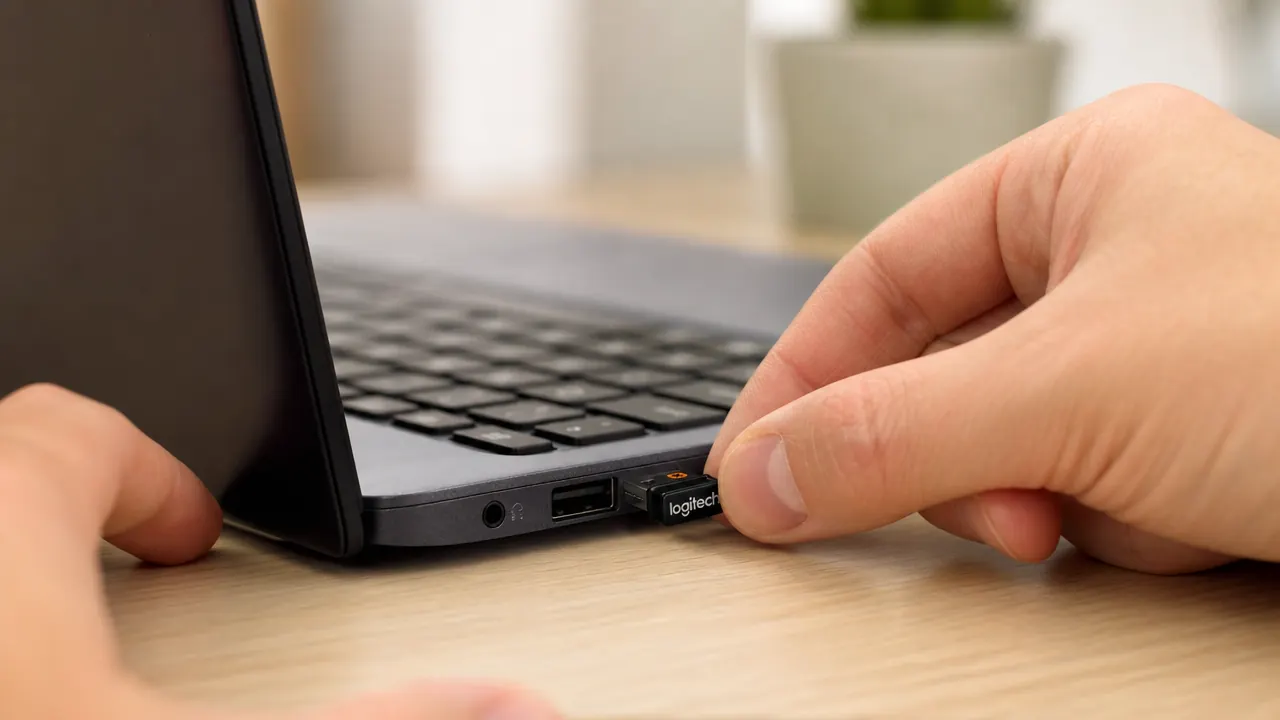
Open the box and locate the USB nano receiver first, before anything else. On the MK270, it ships tucked inside the mouse battery compartment, not loose in the box. It is small, about the size of a fingernail, and easy to overlook. If you start by powering on the keyboard and mouse before plugging in the receiver, nothing will respond and you will spend two minutes wondering if you got a defective unit.
Plug the receiver into a USB port that will not be constantly jostled. On a desktop tower, the back-panel USB ports are better than the front-panel ones. On a laptop, choose a port on the side that faces away from where you reach for your mouse. The receiver needs to stay seated permanently. Pulling it out to use the port for something else and reinserting it works fine occasionally, but the tiny connectors on nano receivers wear faster than full-size USB plugs. Find a port and leave it there.
If you only have one USB port available, a two-port USB hub solves this cleanly. Plug the hub in once, put the Unifying Receiver in one slot, and use the other slot for whatever else you need.
Step 2: Install the Batteries
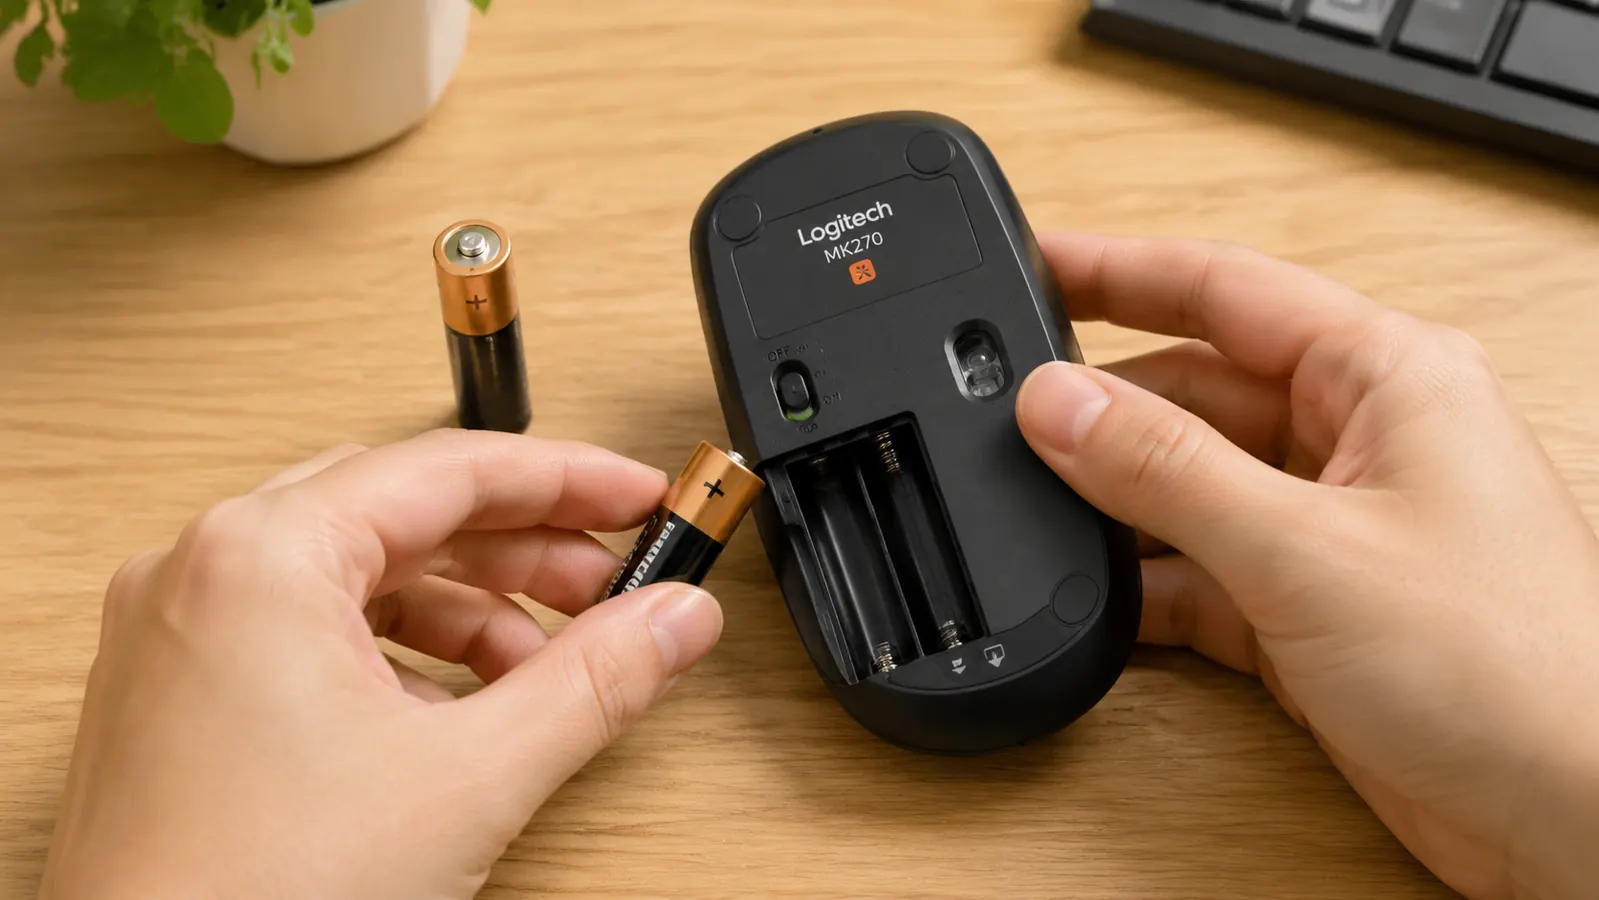
The MK270 keyboard takes two AA batteries and the mouse takes one AA. Neither are included in the box. Grab three AA alkalines before you sit down, or buy a four-pack of Eneloop rechargeable AAs if you want to stop thinking about battery purchases entirely. Eneloops hold a charge on the shelf for years and they pay for themselves after two replacement cycles.
Match the polarity markings inside each compartment carefully. The keyboard compartment is on the underside near the top edge. The mouse compartment is on the bottom. Both have clear plus and minus indicators. Seat the batteries all the way in and close the covers firmly until they click. If either cover feels loose, the batteries have not seated completely.
Once the batteries are in, flip the keyboard and mouse right-side up. You will see a small power switch on each device. Slide both to the on position. A green indicator light on the mouse will blink briefly, then go solid. That means it found the receiver.
Step 3: Confirm Auto-Pairing (Most Modern Logitech Combos Do This Automatically)
Here is the part that trips people up the most, and the answer is: almost nothing is required. Modern Logitech combos with a Unifying Receiver ship pre-paired from the factory. The keyboard and mouse are already linked to the specific receiver in the box. You plug in the receiver, install the batteries, flip the power switches on, and both devices are live. No software installation required for basic use on Windows or macOS.
Open a text editor or the browser address bar and type a few characters. If the letters appear, the keyboard is paired. Move the mouse and confirm the cursor tracks on screen. If either device does not respond within about 10 seconds of powering on, press the small connect button on the bottom of the unresponsive device for three seconds. This forces a fresh pairing handshake with the receiver. On the MK270 that button is labeled with a small wireless icon, recessed so you will not hit it accidentally.
If you want to pair additional Logitech devices to the same single receiver, that is what Logitech's free Unifying Software does. One receiver can handle up to six Logitech Unifying devices. Download it from logitech.com if that is relevant to your setup, but it is optional for the standard two-device combo.
Step 4: Test Response and Confirm No Interference
Before you commit to a desk position for the receiver, do a quick interference check. Open a document and type rapidly for about 30 seconds. Look for any dropped characters or delayed response. Then move the mouse to the edges of the screen and back. Both devices should feel immediate and smooth, with no stutter.
If you notice lag or dropped inputs, the most common cause is a nearby USB 3.0 device creating radio interference. USB 3.0 ports and cables emit RF noise in the 2.4 GHz band, which is the same band the Logitech receiver uses. The fix is to use a short USB extension cable to move the receiver away from the port and closer to the edge of the desk, away from hard drives, docking stations, and other USB 3.0 devices. A 6-inch extension cable costs about two dollars and eliminates this problem completely.
Step 5: Position the Keyboard and Mouse for Shoulder-Width Comfort
This is where most setups go wrong, and where going wireless actually helps you fix it. With a wired setup, the cable pulling on the mouse creates a subtle constant tension on your wrist. Wireless removes that. But you still need to place the keyboard correctly or you are creating a different tension problem: rounding your shoulders inward.
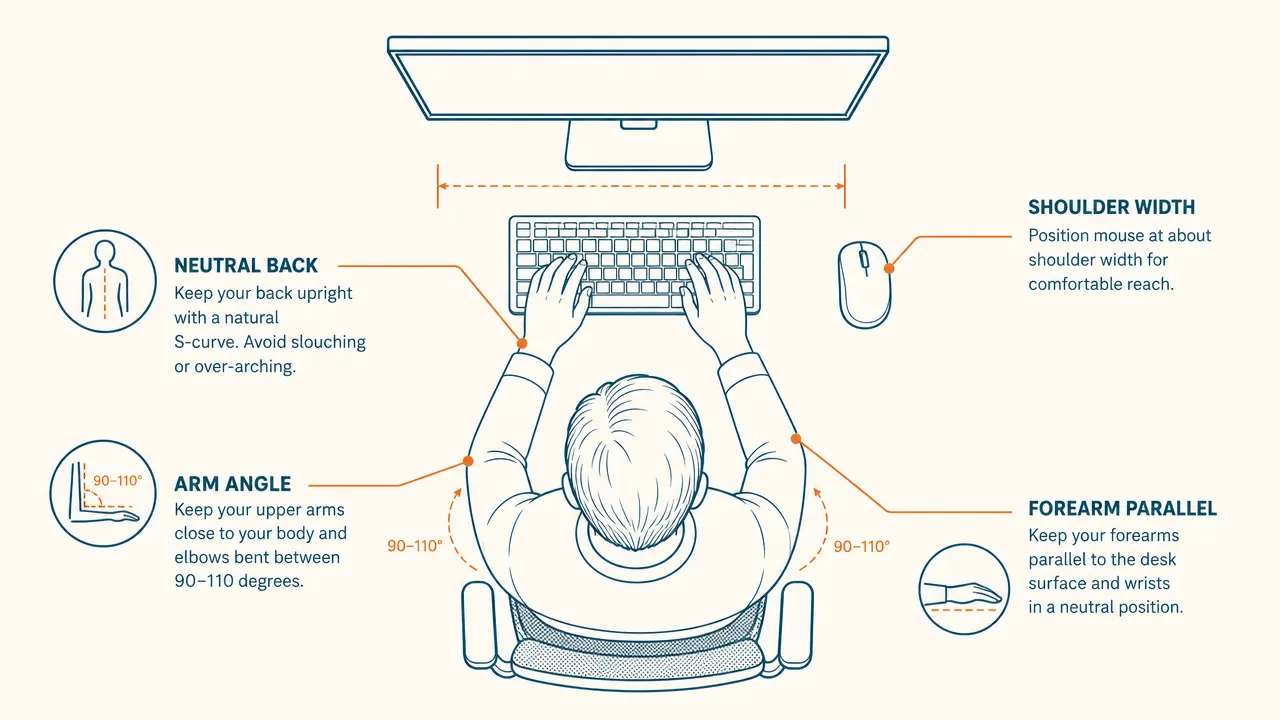
Center the keyboard directly in front of your monitor. Your arms should hang naturally from relaxed shoulders, with your forearms parallel to the desk surface or angled slightly downward. If you have a full-size keyboard with a number pad, the number pad pushes the alphanumeric keys off-center. Some people counter this by centering on the B key rather than the middle of the keyboard body. Experiment with this if you use a full-size keyboard and find your right shoulder creeping forward.
Position the mouse directly to the right of the keyboard, or to the left if you are left-handed, with no gap between them. Your elbow should stay close to your body when you reach for the mouse, not extend outward. If you find yourself reaching far to the right, the keyboard is sitting too far left. Adjust until the mouse sits at roughly the same distance from your body as the space bar.
Center the keyboard in front of your monitor. Position the mouse close enough that your elbow stays near your side when you reach for it. That single adjustment removes more shoulder tension than any ergonomic accessory I have bought.

Step 6: Place a Mouse Pad for Tracking Accuracy
Modern optical mice work on most surfaces, including wood desks, and the MK270 mouse tracks acceptably on a bare desk. But a mouse pad still helps in two ways: it gives the optical sensor a consistent surface that reduces cursor stutter on highly reflective or glass-like desk finishes, and it protects the desk surface from the slight abrasion of moving the mouse thousands of times per day.
A basic cloth mouse pad in the medium size range (around 10 by 8 inches) is all you need. No gaming pad required. Position it so the right edge aligns with the right edge of the keyboard, keeping everything tidy and ensuring you never run out of pad when scrolling across a wide monitor. If you are left-handed, mirror this placement on the left side.
Step 7: Configure System Shortcuts
The MK270 keyboard has a row of F-keys that double as media and function shortcuts. By default on Windows, pressing F1 through F12 triggers the secondary functions (volume, brightness, play/pause) rather than the standard F-key commands. If you use F-keys for software shortcuts, that default is going to frustrate you immediately. On Windows, you can swap the default behavior in the Logitech Options software, or by pressing the Fn key simultaneously to toggle between modes on a per-keystroke basis.
On macOS, the MK270 works without any drivers at all, but the Windows key on the keyboard maps to the Command function and the Alt key maps to Option. This is the correct behavior and does not need adjustment. The only thing worth configuring on a Mac is assigning the Fn key behavior in System Settings under Keyboard, where you can choose whether the top row acts as standard function keys or media keys.
Take five minutes to open your system shortcuts panel and verify that the keys you rely on most, things like copy, paste, undo, screenshot, and app switching, all behave as expected. This is faster to do right after setup than to troubleshoot later when you are in the middle of actual work.
Step 8: Set Your OS Pointer Speed
The MK270 mouse uses a 1000 DPI optical sensor. That is adequate for most home office use on a standard 1080p or 1440p monitor. On Windows, the default pointer speed sits at 6 out of 11 in the mouse settings panel, which is a reasonable starting point. If the cursor feels sluggish across a wide monitor, bump it to 7 or 8. If it jumps around too quickly for fine text editing, pull it back to 5.
One setting to leave alone on Windows is Enhance Pointer Precision. This is a software acceleration feature that makes the cursor move farther when you move the mouse faster, and shorter when you move it slowly. For general office use it feels natural, but if you ever find yourself trying to click on small UI elements with precision and missing, disabling it produces a linear response that is easier to control. On macOS, pointer acceleration is always on and there is no built-in way to disable it. Third-party utilities like LinearMouse can do this if it bothers you, but most office users never notice.
Step 9: Set a Battery Replacement Reminder for 12 to 15 Months Out
Logitech rates the MK270 keyboard at 24 months of battery life and the mouse at 12 months, based on typical daily use of about eight hours. Real-world results vary. The keyboard often outlasts the estimate. The mouse usually does not. Set a calendar reminder for 12 months from today as a proactive replacement prompt for the mouse battery, and 18 to 20 months for the keyboard.
Both the keyboard and mouse will give you a warning before they die completely. The mouse has a small red LED that starts blinking when the battery drops below roughly 15 percent. The keyboard does not have an indicator light, but keystrokes will start misfiring and feeling intermittent before it gives out. At the first sign of that, replace the batteries. Do not try to stretch the last two weeks out of them. A fresh AA costs less than 50 cents and a missed keystroke in an important document is a real cost.
If you switch to rechargeable AAs, charge both the mouse and keyboard batteries on the same day each year, rather than waiting for the low-battery warning. That way you always have a full charge in both devices and never get caught mid-session.
Step 10: Troubleshoot a Missed Keystroke
If you start noticing dropped characters or keys that have to be pressed twice to register, work through this sequence before assuming the keyboard is failing. First, check battery level. Low battery is the cause of about 80 percent of the missed-keystroke complaints I have seen. Second, check for interference as described in Step 4. Moving the receiver closer to the keyboard using a short extension cable fixes most remaining cases. Third, power cycle both devices by flipping the switches off for ten seconds and back on. This clears any stalled connection state.
If missed keystrokes persist after all three checks, try the re-pairing procedure: unplug the receiver, hold the connect button on the keyboard for five seconds, plug the receiver back in, then hold the connect button again for three seconds. The keyboard and receiver will re-negotiate the channel they communicate on. This almost always resolves stubborn connection problems.
One final note: if you use a laptop in clamshell mode with an external monitor, make sure the laptop is not in sleep mode when you first wake the keyboard and mouse. Some sleep states shut down the USB bus entirely, which means the receiver loses power and both devices appear unresponsive. A brief press of the keyboard spacebar usually wakes the system, but if the USB bus was fully cut, you may need to physically wake the laptop first with its power button. This is a system setting, not a keyboard defect.
What Else Helps
Once the keyboard and mouse are set up cleanly, a few small additions complete the picture. A cable clip or adhesive cable channel on the underside of the desk keeps the monitor cable and power cable out of sight, so the only thing on the desk surface is your mouse pad and keyboard. A desk mat that covers the entire work area gives the setup a unified look and makes repositioning the keyboard and mouse easy without worrying about scratching the surface.
If you are using the MK270 with a standing desk converter or at a secondary workstation, the 33-foot wireless range means you can sit further back on a couch or at a secondary chair without losing connectivity. That kind of flexibility is one of the underrated benefits of going wireless that does not show up in the spec sheet but matters a lot in real daily use. For more on why the MK270 specifically holds up after extended use, see the full long-term review.
For a look at the full case for going wireless in a home office context, the companion piece on why a wireless keyboard and mouse combo declutters a desk covers the benefits from a different angle, including how cable routing affects visual noise and focus.
The MK270 is the combo this entire guide is built around. If you do not have it yet, here is where to start.
Over 118,000 reviews, 4.5 stars, a 33-foot range, and a single nano receiver for both keyboard and mouse. Runs on standard AA batteries and works on Windows and macOS with no driver install required.
Amazon Check Today's Price on Amazon →