Monitor arm installations go wrong in predictable ways. Somebody skips the rubber pads, cranks the clamp down tight against bare laminate, and three weeks later there's a pressure dent in the desk finish and a slow forward tilt developing on the arm. Or the desk turned out to be half an inch thicker than expected and the clamp won't close. Or the ultrawide that looked fine in the cart spec sheet weighs nineteen pounds and the arm's spring is rated for seventeen. All of these are fixable situations if you catch them before you start. None of them are fixable after the clamp has already left a mark.
This guide walks through clamp-mounting the HUANUO Single Monitor Arm, which handles screens from 13 to 34 inches and sits under $50 with over 7,000 reviews behind it. The principles here apply to any clamp-mount arm, but the HUANUO is what I'm working with and the details are specific to it where they differ from generic advice.
If you're still deciding on an arm, the HUANUO ships with rubber pads, grommet hardware, and a hex key. Everything in this guide is in the box.
Fits monitors 13 to 34 inches, clamps desks from 0.7 to 3.5 inches thick, gas spring tension is user-adjustable. Under $50 with a 4.6 rating across 7,093 reviews.
Amazon Check Today's Price on Amazon →Step 1: Check Your Desk Thickness
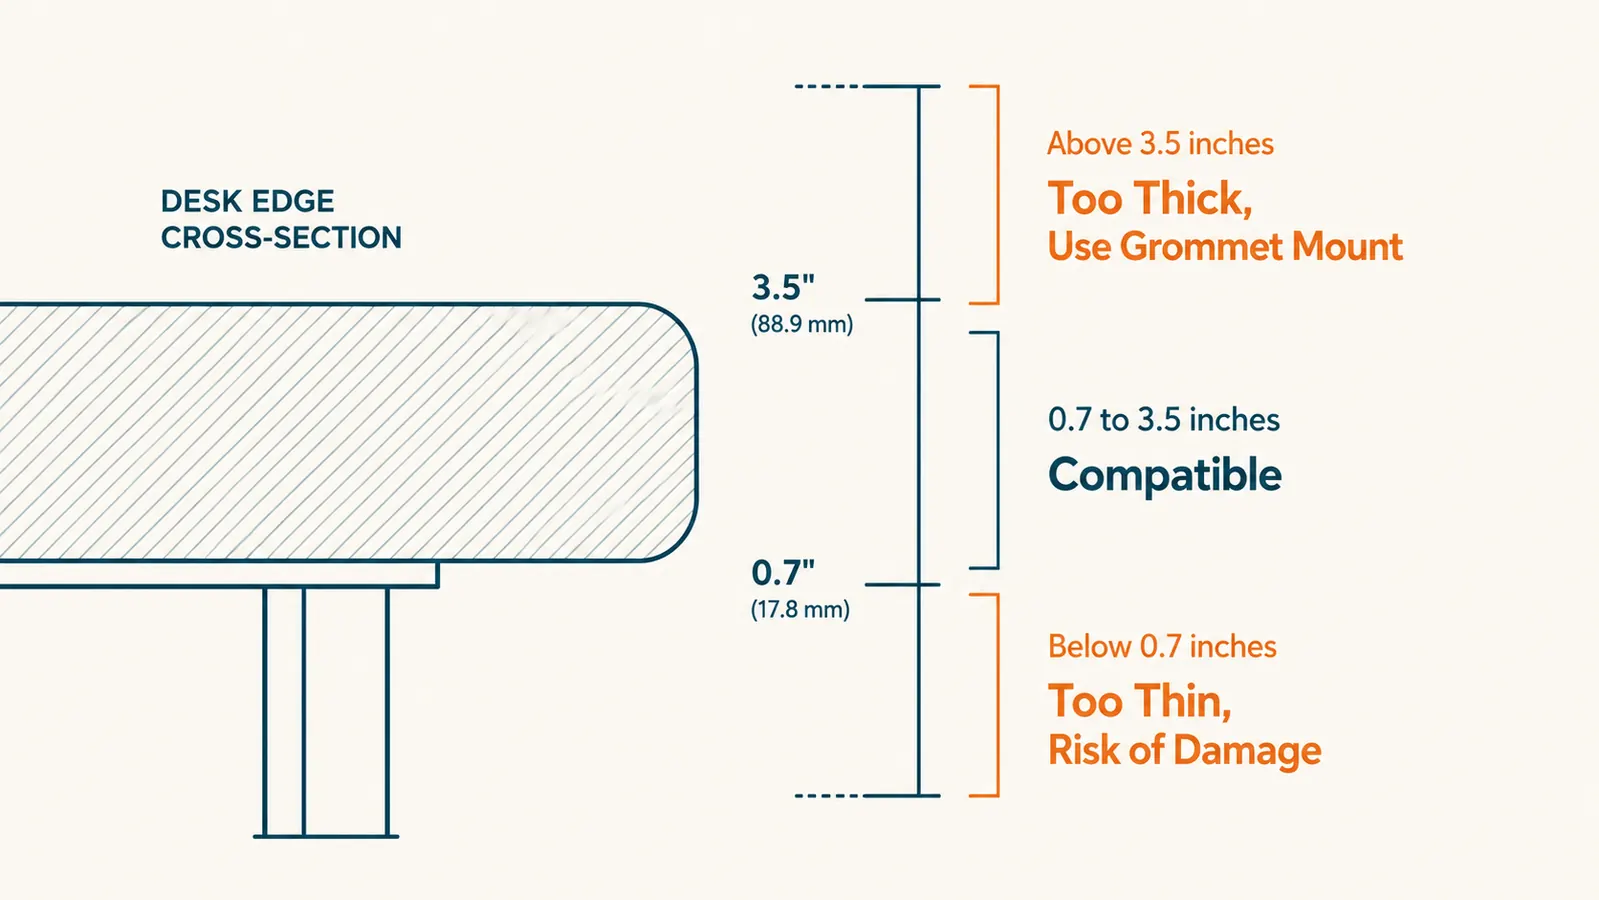
The HUANUO clamp spans desk edges from 0.7 to 3.5 inches thick. Most standard home office desks fall between 0.75 and 1.5 inches, so the clamp fits. The places this check matters are thicker standing desk tops made from solid wood or bamboo, which can run 1.75 inches or more, and hollow-core doors used as desks, which can dip below 0.75 inches at the edge. Measure with a tape measure or calipers before you open the box.
If your desk has a thick apron rail or a reinforcing lip on the underside, that structure reduces the actual clamp opening depth. Measure the usable gap, meaning the distance from the top surface down to the bottom of whatever the lower jaw will contact. A thick apron that leaves only an inch of open space means a clamp rated to 3.5 inches won't work on that desk regardless of total thickness. Either choose a different clamp position farther from the apron, or switch to a grommet mount.
For desks that are too thick, the HUANUO includes a grommet mount base as an alternative. Grommet installation requires a hole in the desk surface between 0.8 and 1.2 inches in diameter. The post drops in from the top, a washer and nut secure it from below. More stable, more permanent. Skip ahead to Step 5 if that's the route you're taking.
Step 2: Verify Your Monitor's Weight Against the Arm's Limit
The HUANUO arm is rated to 17.6 lbs. For most monitors this is not a concern. A 27-inch flat panel typically comes in around 9 to 12 lbs without its stand. Where the weight check actually matters is ultrawide monitors in the 34-inch range. Curved 34-inch displays vary significantly by brand and build. Some land at 14 lbs. Some push past 18 or 19 lbs with the panel plus built-in electronics.
Look up the product spec sheet for your specific model and find the listed weight without stand. If the number isn't available, weigh it. A kitchen postal scale works fine. An arm running near or past its rated load limit doesn't fail dramatically. It slowly loses tension over weeks, which shows up as a monitor that drifts downward over the course of a workday. By the time you notice, the gas spring has already been working harder than it should. The right answer is to verify beforehand, not troubleshoot afterward.
Step 3: Inspect and Seat the Rubber Pads
The HUANUO clamp ships with rubber pads on both jaws. Before you do anything else, pull the arm out of the packaging and check that both pads are seated flat and square in their recesses. Shipping can shift them. Run your finger across each pad. If either is sitting crooked or has a lifted edge, press it flat. This takes ten seconds and is the difference between a clean install and a surface mark.
The pads do three things: they distribute clamping pressure over a wider contact area so it doesn't concentrate on a hard metal edge; they protect the desk finish from scratches; and they add friction so the clamp doesn't creep or rotate over time under the weight of the arm. Skipping them, or using them seated wrong, removes all three of those protections at once.
On a lacquered, high-gloss, or very soft wood surface, add an additional layer of felt between the rubber pad and the desk surface. Cut a small square from furniture felt pads, which cost about four dollars for a pack. The rubber pad alone handles most surfaces without marking. The rubber-plus-felt combination is for surfaces where even light contact marks show.
Step 4: Clamp Placement and Initial Tightening
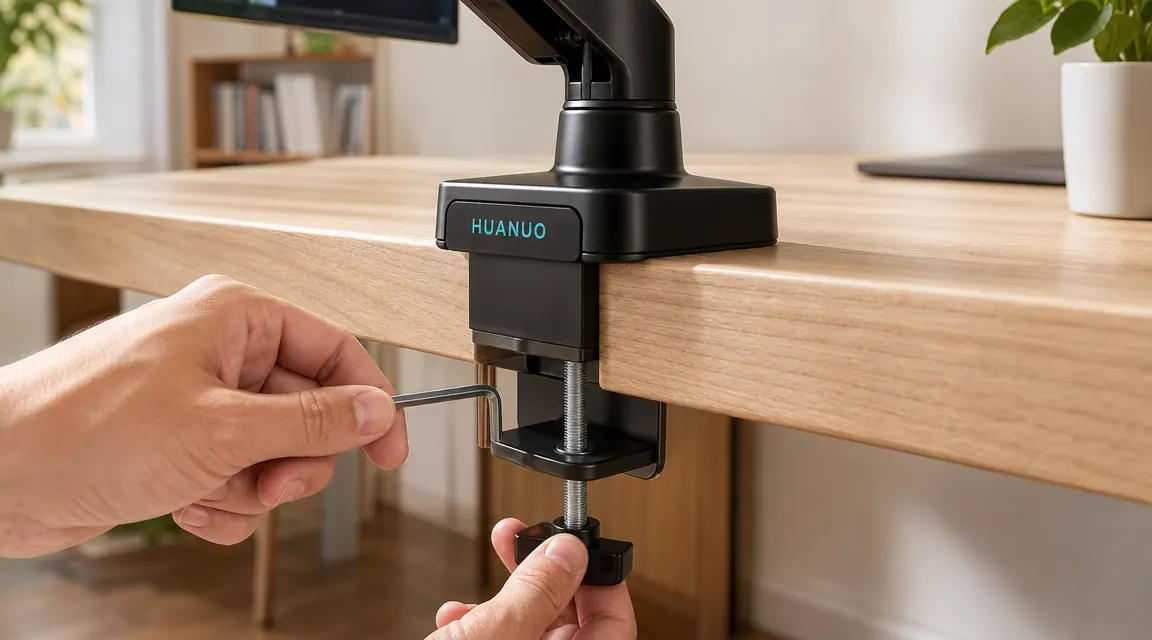
Position the clamp on the desk edge in the spot where you want the arm's vertical pole. The arm extends forward from the pole, so set the pole where the arm will naturally reach your monitor position. For most seated setups that's roughly along the back quarter of the desk. Avoid clamping at a corner, where the two desk surfaces meet at an angle and the clamp can't sit square. Avoid clamping directly over a cable tray or reinforcing bar underneath the surface, because the clamp jaw won't seat flat.
Open the lower jaw to slightly wider than your desk thickness. Lower the upper jaw onto the desk surface. Confirm both rubber pads are making flat contact. Hand-tighten the knurled thumbscrew on the lower jaw until the clamp holds position without sliding but can still be repositioned with deliberate force. At this stage you want snug, not locked.
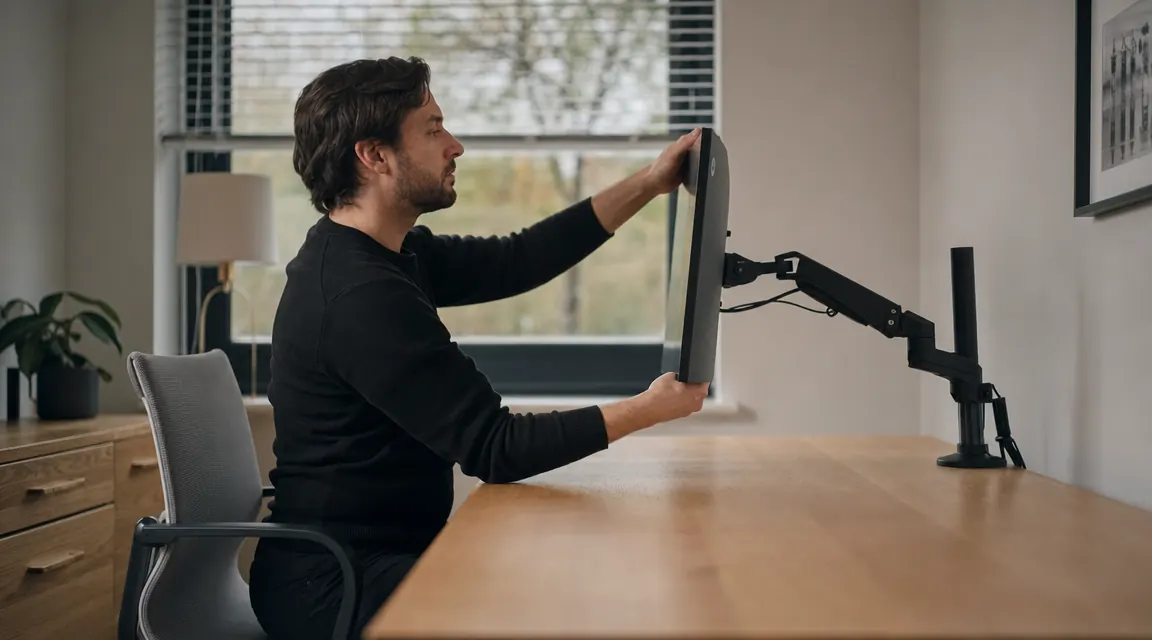
Attach the monitor to the VESA plate before you do the final tighten. The monitor's weight changes the torque needed to stop the arm from drifting. If you tighten with an empty arm and then hang a monitor, the arm often slowly tilts forward over the first hour as the gas spring settles under load. Mount the monitor, let the arm hold the weight for a moment, then move to the hex wrench.
Step 5: Final Tighten and Stability Check
Use the included hex key on the bolt at the base of the lower jaw. Start with a half-turn past hand-tight. Then push the arm firmly side to side and forward and back with the monitor attached. If the clamp rotates or shifts on the desk, another quarter-turn. Repeat until pushing the loaded arm produces no movement in the clamp position.
The stopping point is when the arm stays fixed under deliberate force. Past that, additional tightening compresses the rubber pads without adding any holding strength. On thin laminate or particleboard desks, continuing past the stability point bows the desk surface and causes delamination. The rule is: tighten until it stops moving, then stop.
Tighten until the arm stops moving under deliberate force. After that, you're just compressing the desk surface, not improving the hold.
Step 6: Adjust Gas Spring Tension to Your Monitor Weight
With the monitor mounted and the clamp locked, lower the arm to its lowest position and release it. If the arm floats upward on its own, the spring is too strong for your monitor. If the arm sinks when you let go, the spring is too weak. Either condition needs to be corrected before you consider the install finished.
The tension adjustment on the HUANUO arm is a bolt at the base of the arm's main joint, accessible with the included hex key. Turn clockwise to increase tension (use for heavier monitors or a sinking arm), counter-clockwise to decrease it (use for lighter monitors or a floating arm). Make quarter-turn adjustments and test after each one. The correctly tensioned arm holds any position you leave it in without drifting. That is the only pass condition.
Step 7: Route Cables Before You Finalize Monitor Position
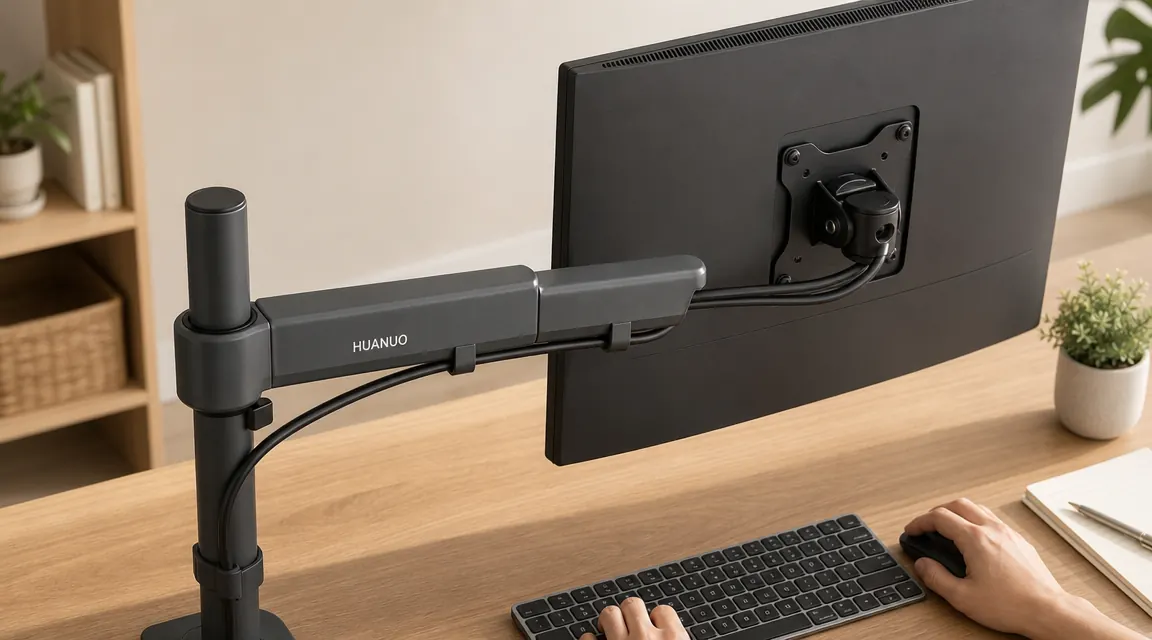
The HUANUO arm has cable management channels along the arm segment. Feed your display cable and USB cables through those channels before you plug anything in and before you set your final monitor angle. Once the cables are plugged in and taut behind the monitor, threading them back through the channels requires disconnecting everything and starting over.
Leave a few inches of extra cable slack at the base of the vertical pole. The arm's full range of motion, especially the forward-and-back swivel, pulls the cable in different directions depending on position. Too little slack means the cable resists the arm's movement and creates drag over the joint. Over time, that drag wears on the pivot and causes the arm to feel stiff. The fix is free: just leave more cable at the base.
Step 8: Set Height and Tilt for Your Seated Position
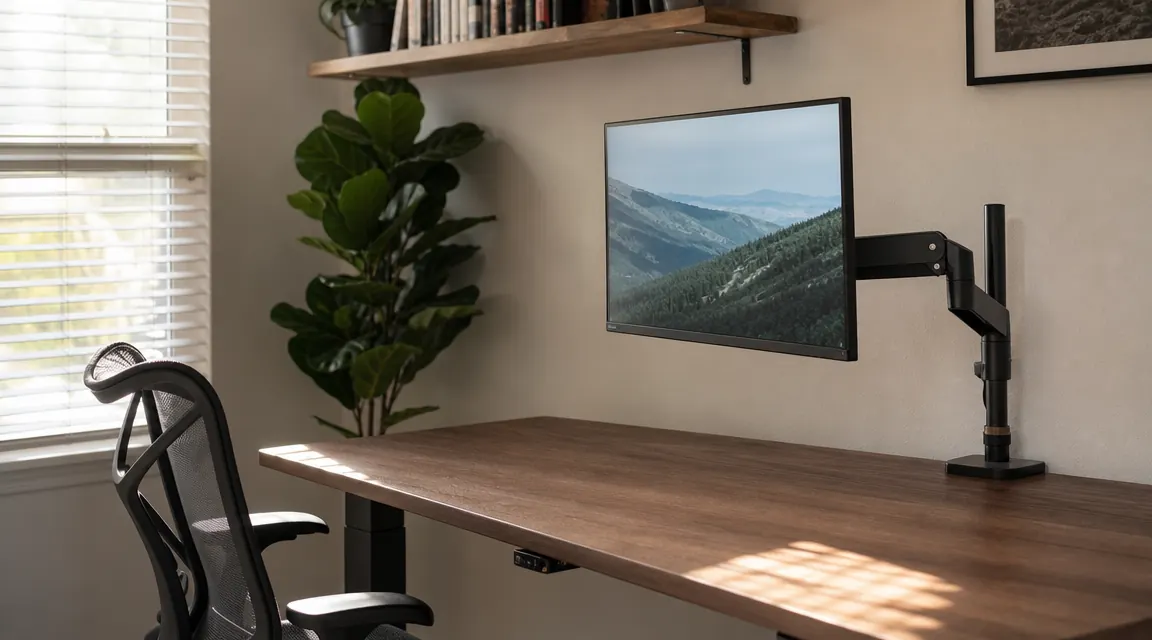
Sit in your chair in your normal working position. Extend the arm so the monitor is in front of you. The top edge of the monitor should sit at or just below eye level. If you're looking down at the screen, raise the arm. If you're craning up, lower it. This matters more than most ergonomic adjustments because it determines your neck angle for every hour you spend at the desk.
Tilt the screen back slightly, about 10 to 15 degrees so the face of the panel is roughly perpendicular to your line of sight rather than vertical to the floor. A slight backward tilt reduces the amount of overhead light that reflects off the surface and is easier on the eyes for long sessions. Swivel the arm left or right until the monitor is centered in front of your keyboard. Then look away and look back. If you have to adjust your head position to find the screen, something is still off. Adjust until looking at the screen feels like looking straight ahead.
What Else Helps
The arm gets the monitor into the right position. The chair gets your body into alignment with it. If the chair isn't set correctly, a well-mounted arm doesn't fix much. Seat height should put your elbows at desk level with your shoulders relaxed and not raised. If you're compensating for a chair that's too low or too high, you will end up with the same neck and shoulder fatigue you were trying to solve with the arm in the first place.
Cable management on the rest of the desk is worth finishing once the monitor cable is hidden. The arm does most of the visual cleanup on its own, but once the display cable disappears, the remaining surface cables stand out more than they did before. A simple cable spine along the back of the desk, or a clip rail on the underside, handles the rest in about twenty minutes and finishes what the arm started.
If you want a deeper look at how the HUANUO arm holds up over eight months of daily use, including spring tension drift and build quality over time, the long-term HUANUO monitor arm review covers the specifics. And if you are still weighing whether a monitor arm is worth it at all for a small desk, the piece on what a monitor arm actually changes on a small desk walks through the concrete differences without the hype.
The HUANUO arm this guide is built around: fits 13 to 34 inch screens, includes clamp and grommet hardware, rubber pads already installed.
Under $50, 4.6 stars, 7,093 reviews. Gas spring tension is user-adjustable. If you've measured your desk and confirmed your monitor weight, this is a clean and straightforward install.
Amazon Check Today's Price on Amazon →